React 简书项目实战
Table of Contents
使用 styled-components 为组件添加样式
-
网址: https://styled-components.com/
-
概述: 一个 css-in-js 思想下的, 方便写css的库。
-
为什么使用它? 在使用
create-react-app创建的项目中, 如果在一个地方以import xxx.css的形式导入某个样式文件, 这个样式文件会被所有的组件共享, 需要注意不同的样式文件中不要起相同的类名. 要想每个组件使用不同的样式文件, 我们可以借助于styled-components. 此外,我们可以利用js的语法,来增强css,而不是像 sass,less 等通过预处理器来增强css。 -
原理: styled-components generates an actual stylesheet with classes, and attaches those classes to the DOM nodes of styled components via the className prop.
- 为什么使用它? (特性): 包括刚才说的, styled components 具有以下特性:
- 利用js来增强css.
- Automatic critical CSS: 样式化组件跟踪页面上呈现的组件,并完全自动地注入它们的样式。
- No class name bugs: 为样式生成唯一的类名.
- Easier deletion of CSS: 很难知道样式文件中的某个类作用于代码中的哪个地方. styled-components 使得所有样式都紧密的与某个组件相关联, 很容易知道某个样式作用于哪里.
- Simple dynamic styling: 根据组件的props或全局主题调整组件的样式是简单而直观的,无需手动管理几十个类.
- Painless maintenance: 无需遍历其他文件来查找影响组件的样式,方便维护.
- Automatic vendor prefixing: 按照当前的标准编写CSS,然后让样式化的组件处理其余部分。
- 整体用法
- 使用yarn安装
styled-components依赖. - 编写样式组件. 当你定义样式时, 你是真的在创建一个普通的具有指定样式 React 组件.
- 用样式组件将目标组件包裹起来.
- 使用yarn安装
- 具体用法-基本
- 创建样式组件
- 利用 tagged template literals 创建.
const Thing = styled.div`color: blue`; const Thing = styled.div`color: ${props.color}`; - 利用 style objects 创建.
 const Thing = styled.div({color: blue}); // 样式对象
 const Thing = styled.div(props => {color: props.color}); // 函数, 返回样式对象
- 利用 tagged template literals 创建.
- 继承
- 不改变目标组件的html元素类型, 直接继承
const Div = styled.div`color:blue`; const Div2 = styled(Div); - 改变目标组件的html元素类型, 在目标组件上加
asconst Div = styled.div`color:blue`; const link = <Div as="a" href="/">a link</Div> - 父组件为自定义组件.
styled方法适用于所有的自定义的或者任何第三方组件, 只要他们将传入的className这一 prop 给到 DOM 元素上.const Div = ({ className, children }) => (<div className={className}>{children}</div>); const StyledDiv = styled(Div)`color: palevioletred; font-weight: bold;`;
- 不改变目标组件的html元素类型, 直接继承
- 编写样式
- css预处理器: 使用stylis预处理器, 语法类似于scss.#
- 可以把样式组件本身看作是一种可以被选择器选择的div这样的元素类型, 在组件样式中用
&来引用这一类型. 普通css的作用域是全局的, 但这里的作用域仅限于样式组件内, 默认是只作用于该组件的后代. &&可以被用于提升组件的规则的 specificity.
- 可以把样式组件本身看作是一种可以被选择器选择的div这样的元素类型, 在组件样式中用
csshelper function#: 之前说的定义的样式都是绑定到某个HTML元素或是组件上的, 有时候只是想定义与元素无关的可以复用的css样式, 可以借助css. props 会从父组件自动传递给 complexMixin. 不使用css这一 helper function的话,complexMixin会得到"color: props => (props.whiteColor ? 'white' : 'black')"这一字符串结果。这是因为 template literals 中,会将表达式直接转成字符串,所以我们不可以在template literal 中使用函数。const complexMixin = css`color: ${props => props.color}` const StyledComp = styled.div`${props => props.complex ? complexMixin: "color: blue"}`
- css预处理器: 使用stylis预处理器, 语法类似于scss.#
- props
- 自动区分 props 与 attribute: styled-components 会自动对传入的属性做区分. 如果添加样式的目标是基础元素, 会从传入的属性拆分出其基本的 HTML 属性直接添加到元素上, 并将剩余属性作为 props.
- 附加额外的props: 为了避免不必要的只是向渲染组件传入某些 props 的嵌套, 可以使用
.attrs构造器. 它使得你可以为一个组件附加额外的 props. 当多个样式组件嵌套或继承时子组件可以覆盖父组件的.attrs里重复的 props.const TextInput = styled.div.attrs(props => {type: "text", .color: props.color || "red"})`color: ${props.color}`
- 创建样式组件
- 具体用法-高级
- Animation: 需要借助
keyframes这一helper function来定义keyframe. - React Native: 与 web-version 相比, 不可使用
keyframes和createGlobalStyle. - Theming: 通过context api, theme 里定义的属性, 会放到 ThemeProvider 里的每个组件的props里. 可通过 function themes 设置子主题.
- Refs: 对目标是基本DOM元素的样式组件(如通过styled.div定义的)使用refs, 会返回潜在的DOM节点; 对目标是自定义组件的样式组件使用refs, 会返回组件实例. 总之, 可以将styled.div/styled(MyComponent) 看作只是为css属性们生成一个独一无二的class, 并给目标组件加了class而已. (虽然内部更复杂).
- Security: 不要把用户的输入作为样式, 会带来安全隐患. 如当 background 通过 url 设置, 且 url 是用户输入的话, 用户如果输入一个 api 的 url, 会直接调用该 api. #.
const userInput = '/api/withdraw-funds' const ArbitraryComponent = styled.div` background: url(${userInput}); /* More styles here... */ ` - Existing CSS: 由于 styled-components 的工作模式是, 生成一个类的样式表, 并将这个类通过
className添加到节点上. 如果你要添加样式的目标组件已经有一个全局 class 的话, 需要注意一下结合的方式. 如果多个 class 里重复设置了同优先级的某个属性, 会采用最后一个 class 的设置.class MyComponent extends React.Component { render() { // Attach the passed-in className to the DOM node return <div className={`some-global-class ${this.props.className}`} /> } } - Referring to other components
const link = styled.a`` const Icon = styled.svg` ${Link}:hover & { fill: blue } ` const Component = () => (<Icon><Link href="#"/><Icon>) - Server Side Rendering
- Animation: 需要借助
- 为方便对比记忆, 这里单独列出四种用到括号的情况.
 // 普通通过 template literal 创建
 const Div = styled.div`background: ${props.background}`

 // 继承
 const Div1 = styled(Div)``

 // additional props
 const Div2 = styled.div.attr(props => ({
   background: 'red'
 }))`background: ${props.background}`

 /* 不使用 template literals, 直接利用对象创建 */
 // Style Objects - static
 const Div3 = styled.div({
   background: 'red',
 });
 // Style Objects - based on props
 const Div4 = styled.div(props => ({
   background: props.background
 }));
使用 reset.css 覆盖浏览器默认样式
-
网址: https://meyerweb.com/eric/tools/css/reset/
-
概述: 就是一个普通css文件, 定义了一些基本样式.
- 为什么使用它?
- 为了保证页码在所有浏览器上的展示效果的一致性, 可以使用Reset.css, 覆盖掉浏览器默认样式.
- 使用方式
- 直接把网站主页的css复制过来用就可以, 然后用
styled-components的createGlobalStyle设置为全局样式
- 直接把网站主页的css复制过来用就可以, 然后用
- 一些相关文章:
使用 iconfont 嵌入头部图标
-
网址: https://www.iconfont.cn/
-
概述: 阿里巴巴矢量图标库
- 为什么使用它?
- 海量图标库
- 支持各种格式
- 方便团队协作
-
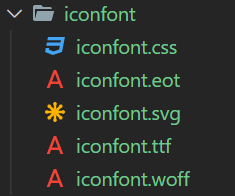
iconfont 的一般使用方法有三种: Unicode, Font class 以及 Symbol, 使用方法在下载解压后的
demo_index.html里都有详细. - iconfont 结合 styled-component 的使用方式:
-
图标下载到本地解压后, 只取
iconfont.css,iconfont.eot,iconfont.svg,iconfont.ttf以及iconfont.woff五个文件即可. (其他文件是和使用说明相关的)

-
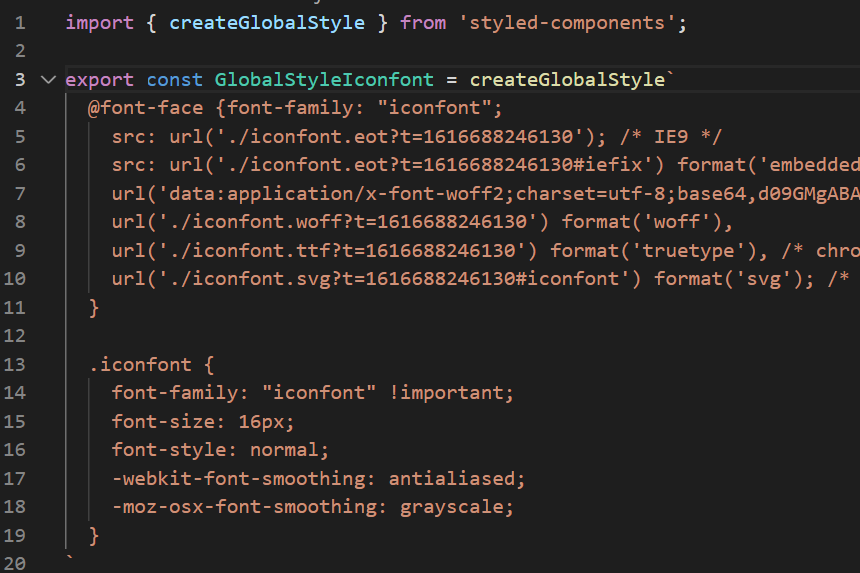
将
iconfont.css中的绝对路径修改为相对路径. 并只保留@font-family和.iconfont

-
将css改为styled-component的格式. 注意 iconfont 应该作为全局样式.

-
挑选相应图标并获取字体变法, 应用于界面. 字体的unicode编码可以在
demo_index.html中看到, 也可以在iconfont.css或 iconfont网站上自己的对应项目中看到.
-
使用 react-transition-group 实现搜索框动画效果
-
网址: https://reactcommunity.org/react-transition-group/
- 概述
- 暴露了组件 transition 的步骤, 使得用户可以在 transition 的不同阶段执行想要的操作
- 由四部分组成: Transition, CSSTransition, SwitchTransition 以及 TransitionGroup
- Transition 组件允许您使用简单的声明性API来描述一段时间内一个组件从状态到另一个状态的转换。常用于动画组件的安装和卸载,也可以用于描述原位过渡状态。
- Transition 组件是一个平台无关的组件. 如果使用CSS中的transition, 则最好使用CSSTransition. 后者继承了前者的所有功能, 并添加了 css transtiion 相关的其他功能.
- 核心思想
- 将 transition 的过程划分成多个阶段, 并将他们暴露出来, 在各阶段之间提供了slot 来供用户操作.
-
“exposes simple components useful for defining entering and exiting transitions…it does not animate styles by itself. Instead it exposes transition stages, manages classes and group elements and manipulates the DOM in useful ways, making the implementation of actual visual transitions much easier.”
- 本质也是切换css类#
- 为什么使用它?
- 比 css transition 的阶段划分更灵活.
- 可以在各个阶段中间插入回调函数, 回调函数中可以直接操作 dom.
- 其他?
- Transition 与 CSSTransition 的区别
Transition的子元素为函数,CSSTransition的子元素为组件或基本元素.- Transition 在不同阶段为函数传入不同的状态字符串, CSSTransition 在不同阶段为组件设置不同的 css class.
- 比起Transition, CSSTransition 将 appear 阶段 (组件刚挂载且 in 为
true) 从 enter 阶段 (in 为true) 中拆了出来.- Transition 的阶段与 slots:
- 当 in=true: (onEnter) => entering => (onEntering) => entered => (onEntered)
- 当 in=false: (onExit) => exiting => (onExiting) => exited => (onExited)
- CSSTransition的阶段与挂载的 css class (设CSSTransition的类名为
*):- 当 in=true 且组件首次挂载: *-appear, *-appear-active, *-appear-done
- 当 in=true: *-enter, *-enter-active, *-enter-done
- 当 in=false: *-exit, *-exit-active, *-exit-done
- Transition 的阶段与 slots:
- 其他注意事项
- Transition 中,
appear属性默认为false,即组件刚 mount 时不会触发 enter 。为true时会。 timeout=等价于timeout={1}- *-active 类表示你希望的动画结束时的样式, 所以应该将
transition属性放且仅在这里, 否则最终效果可能不会如你所想.
- Transition 中,
- CSSTransition 使用方式:
import {CSSTransition} from 'react-transition-group', 使用<CSSTransition>标签将要添加动画的组件包裹起来- 设置一个 state 用来控制 transition 是 enter 还是 exit
class MyComponent{ state = {inProp = true} /* ... */ } - 为
CSSTransition标签指定属性, 有三个最重要的属性:in,classNames和timeout<CSSTransition in={inProp} timeout={200} classNames="my-node"> <div> {"I'll receive my-node-* classes"} </div> </CSSTransition> - 设置相应的 css class. 注意, enter/active/exit三个阶段, 没到一个阶段就会把上一个阶段的class全部移除. 同一阶段内的三个类依次叠加.#:
 .my-node-enter{
   /* ... */
 }
 .my-node-enter-active{
   /* ... */
 }
 .my-node-enter-done{
   /* ... */
 }
使用 Redux, React-Redux 进行应用数据的管理
使用 immutable.js 来管理 store 中的数据
-
概述: 提供了一些常见数据结构的 immutable 版本, 方便创建 immutable 数据和将普通js数据转化为 immutable 数据. 另外还提供了支持 lazy evaluation 的 immutable 数据结构.
-
核心思想: immutable. immutable data 一旦被创建, 不可被更改. immutalbe 的对象上的操作, 只会返回一个新的对象, 而不会对其本身做任何修改. immutalbe collections(List, Map, Set等) 应该被视为值而不是对象. 对象是可以随时间改变的, 而一个值代表着一个事物在某一具体时间的状态.
- 为什么使用它?
- Simpler application development
- No defensive copying
- Enabling advanced memoization and change detection techniques with simple logic.
- 使用方式:
- immutable.js 模拟了 ES2015 的 Array, Map, Set 等. 其上面的任何操作, 都会返回一个新的 immutable 对象.
- 创建: 可以很方便的利用 JS 的对象和数组, 来创建 immutable collection.
const map = Immutable.Map({ a: 1, b: 2, c: 3, d: 4 }); const list = Immutable.List([1, 2, 3]); Immutable.Seq({ a: 1, b: 2, c: 3 }) .map(x => x * x) .toObject(); - 嵌套结构:
const { fromJS } = require('immutable'); const nested = fromJS({ a: { b: { c: [3, 4, 5] } } }); const nested2 = nested.mergeDeep({ a: { b: { d: 6 } } }); // Map { a: Map { b: Map { c: List [ 3, 4, 5 ], d: 6 } } } console.log(nested2.getIn(['a', 'b', 'd'])); // 6 const nested3 = nested2.updateIn(['a', 'b', 'd'], value => value + 1); console.log(nested3); // Map { a: Map { b: Map { c: List [ 3, 4, 5 ], d: 7 } } } const nested4 = nested3.updateIn(['a', 'b', 'c'], list => list.push(6)); // Map { a: Map { b: Map { c: List [ 3, 4, 5, 6 ], d: 7 } } } - immutable data 之间的比较: 不应该使用
===, 应该使用Immutable.is()或.equals(). (虽然出于性能优化, 如果操作结果不对集合本身做任何修改, 会直接返回集合本身, 而不是新建一个对象再返回)const { Map } = require('immutable'); const map1 = Map({ a: 1, b: 2, c: 3 }); const map2 = Map({ a: 1, b: 2, c: 3 }); map1.equals(map2); // true map1 === map2; // false - immutable data 的复制: 由于 immutable collections 应被视为值而非对象, 所以直接像”复制”一个数字那样, 直接让新的引用指向它即可.
const { Map } = require('immutable'); const map = Map({ a: 1, b: 2, c: 3 }); const mapCopy = map; // Look, "copies" are free! - 转换回 JavaScript 对象:
const deep = Map({ a: 1, b: 2, c: List([3, 4, 5]) }); console.log(deep.toObject()); // { a: 1, b: 2, c: List [ 3, 4, 5 ] } console.log(deep.toArray()); // [ 1, 2, List [ 3, 4, 5 ] ] console.log(deep.toJS()); // { a: 1, b: 2, c: [ 3, 4, 5 ] } JSON.stringify(deep); // '{"a":1,"b":2,"c":[3,4,5]}' - Lazy Seq:
 const oddSquares = Seq([1, 2, 3, 4, 5, 6, 7, 8])
   .filter(x => x % 2 !== 0)
   .map(x => x * x);
- 管理 store 中的数据:
- 将 state 从普通对象, 改为 immutable 对象.
import {Search_Focus_Action, Search_Blur_Action} from "./actionTypes" import { fromJS } from 'immutable'; const defaultState = fromJS({ focused: false }); - 修改其他地方改值取值的方式.
- reducer.js
export default (state = defaultState, action) => { if(action.type === Search_Focus_Action){ if(state.get("focused") === false) { // immutable对象的set方法,会结合之前immutable对象的值和设置的值,返回一个全新的对象 return state.set("focused", true) } } else if(action.type === Search_Blur_Action){ if(state.get("focused") === true) { // return newState; return state.set("focused", false); } } return state; } - Header.js (使用了combineRedcuers, 将 Header 的reducer 命名为 header)
 const mapStateToProps = (state) => {
   return {
     focused: state.header.get('focused')
   }
 }
- reducer.js
- 将 state 从普通对象, 改为 immutable 对象.
- 注意事项
使用 redux-immutable 统一数据格式
-
概述:
redux-immutable用于创建一个与 Redux 的combineReducers相同的函数, 但是它创建的全局 state 是 immutable 的. -
核心思想: 利用
immutable.js来增强combineReducers, 使得其自动生成的全局 state 变成了一个 immutable 对象. -
为什么使用它? 之前的代码看起来很难受. 这是因为, combineReducers 生成的全局 state 是一个普通对象, 通过点或中括号来获取属性值. 而组件自己的 reducer 中使用了 immutable.js, 返回组件的state是 immutable 对象. 我们可以直接让
combineReducers生成的全局 state 是 immutable 的.// globle reducer.js export default combineReducers({ header: headerReducer }) // Header.js const mapStateToProps = (state) => { return ({ focused: state.header.get('focused') }) } -
使用方式:
- 使用
redux-immutable中的combineReducers, 来替代 Redux 中的combineReducers://import { combineReducers } from 'redux'; import { combineReducers } from 'redux-immutable'; - 修改组件获取state的方式:
 const mapStateToProps = (state) => {
   return {
     // focused: state.header.get("focused")
     // focused: state.get("header").get("focused")
     focused: state.getIn(["header", "focused"])
   }
 }
- 使用
热门搜索样式布局
Ajax获取推荐数据
代码优化微调
热门搜索换页功能实现
换页旋转动画效果的实现
避免无意义的请求发送
Reference: