Redux 进阶
Table of Contents
UI 组件和容器组件
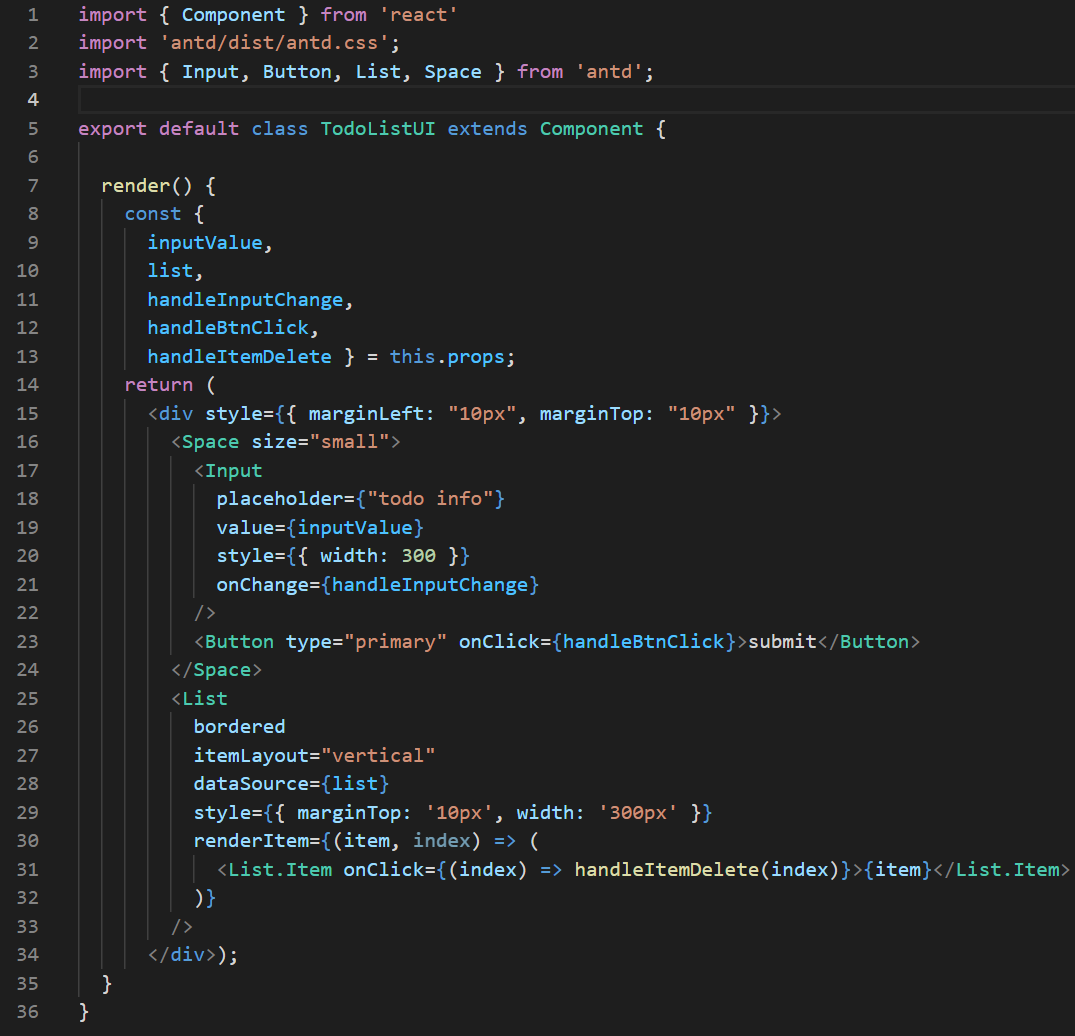
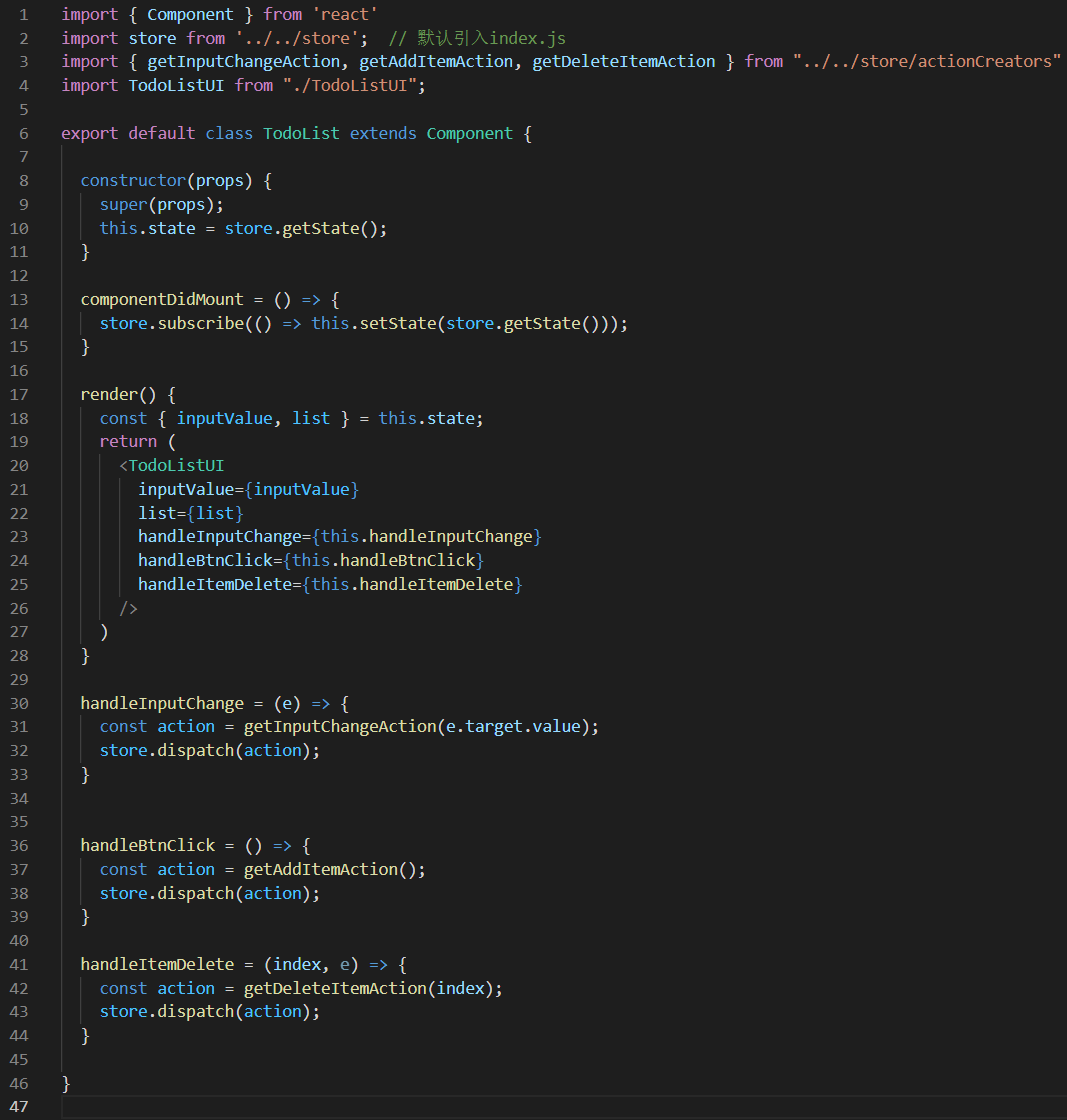
有时候, 我们把一个组件的渲染(render)和逻辑(其他方法)都放到一个组件中时, 组件会很难维护, 此时我们需要对组件进行拆分, 将其拆分成UI组件(傻瓜组件)和容器组件(聪明组件). UI组件只负责页面的渲染, 容器组件只负责业务逻辑和数据的处理. 数据和监听函数在容器组件中定义后通过props传递给UI组件.
UI组件:

容器组件:

无状态组件
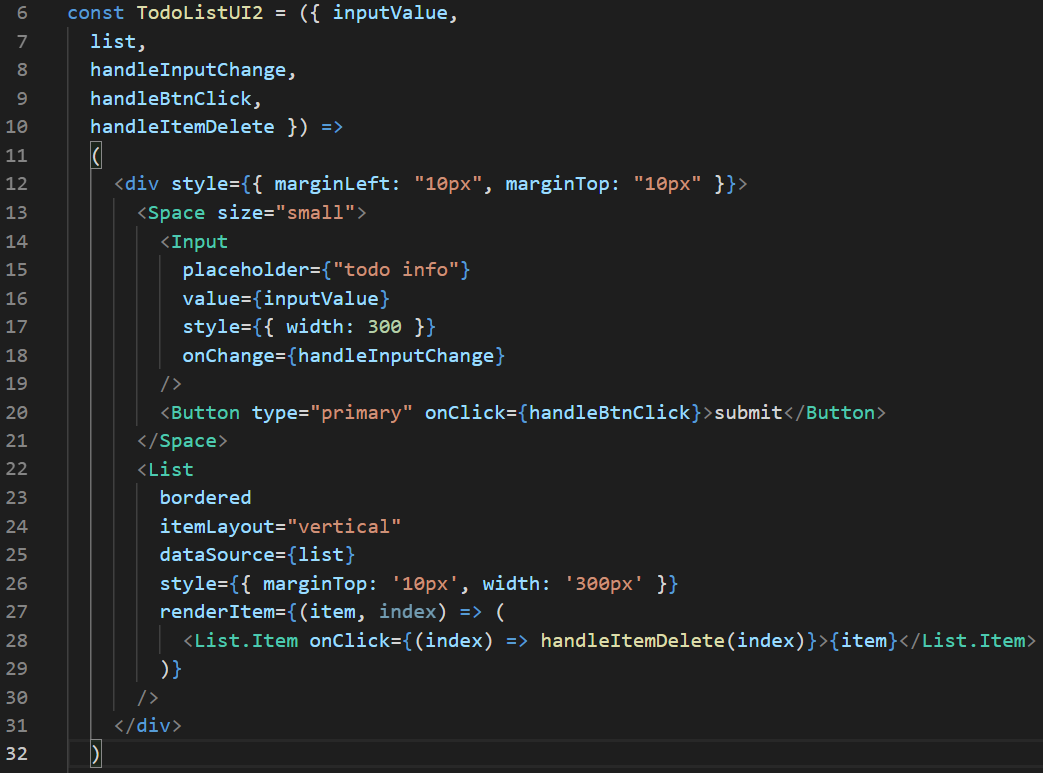
当一个组件里的方法只有render时, 我们可以将其写成一个函数, 称之为无状态组件. 上面定义的UI组件可以写成一个无状态组件, 它可以写成下面这样的函数形式:

无状态组件的优势在于它的性能比较高, 因为它就是一个简单函数, 而我们之前定义的组件是一个类.
Redux 中发送异步请求获取数据
componentDidMount = () => {
  store.subscribe(() => this.setState(store.getState()));
  axios.get("http://localhost:3000/data")
    .then((res) => {
      const data = res.data;
      const action = getInitListAction(data);
      store.dispatch(action);
    })
}
使用 Redux-thunk 中间件实现 ajax 数据请求
如果把一些异步的请求或者非常复杂的逻辑, 都放到组件中实现, 这个组件有时会显得过于臃肿, 我们希望这些代码移到统一的地方进行管理. redux-thunk 这个中间件可以让我们把这些异步请求或复杂逻辑放到action中进行处理.
步骤一: 启用 Redux Thunk (同时也启动 Redux DevTools) :
/* store.js */
import { createStore, applyMiddleware, compose } from "redux"
import reducer from './reducer'
import thunk from "redux-thunk"

const composeEnhancers = window.__REDUX_DEVTOOLS_EXTENSION_COMPOSE__ || compose;
const store = createStore(
  reducer,
  composeEnhancers(
    applyMiddleware(
      thunk
    )
  )
);

export default store;;
步骤二: 正常情况下, actionCreator 应该返回一个对象. 用了 thunk 之后, 它可以返回一个函数了. 我们可以把复杂逻辑放到这个函数里. 这个函数有一个参数dispatch, 相当于store.dispatch. 我们在这个函数里写逻辑继续dispatch其他action来修改state即可.
/* actionCreators.js */
export const getTodoList = () => {
  return (dispatch) => {
    axios.get("http://localhost:3000/data")
      .then((res) => {
        const data = res.data;
        const action = getInitListAction(data);
        dispatch(action);
      })
  }
}
步骤三: 之后在 component 中像普通 action 那样使用即可.
/* TodoList.jsx */
componentDidMount = () => {
  store.subscribe(() => this.setState(store.getState()));
  const action = getTodoList();
  store.dispatch(action);
}
除了可以简化组件外, 这种方式还十分利于自动化测试.
什么是 Redux 的中间件

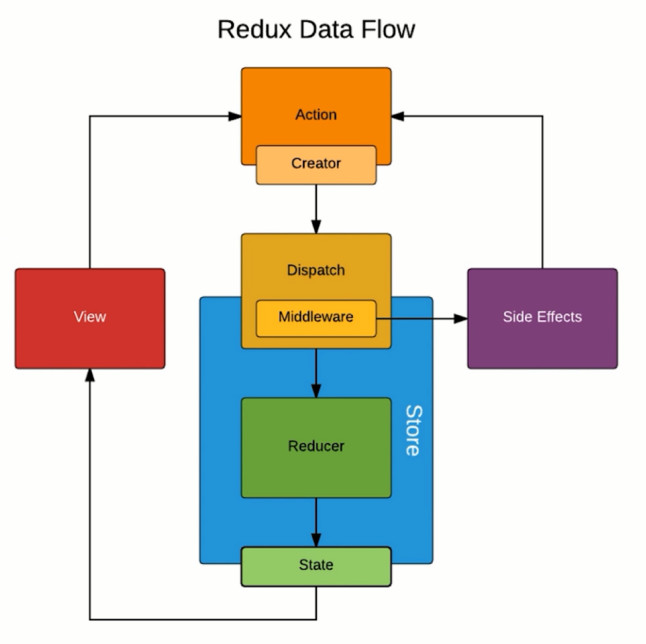
Redux 中间件是位于 Action 和 Store 之间. 不使用中间件时, action 是一个对象, 直接派发给 store. 有了中间件后, action可以是函数了, 这个函数实际上就是对store.dispatch的封装. dispatch 可以区分对象和函数. dispatch 一个函数, 不会直接将它传给 store, 它会直接让函数执行.
除了 redux-thunker 外, 还有 redux-logger (可以记录 action 每次发送的日志), redux-saga (类似 redux-thunker)等.
Redux-saga 中间件使用入门
redux-saga 类似 redux-thunker, 但 redux-thunker 是把异步操作放入action中, redux-saga 的设计思路是单独将异步操作拆分出来放到专门的文件中进行管理
步骤一: 配置saga中间件
/* store/index.jx */
import { createStore, applyMiddleware, compose } from "redux"
import reducer from './reducer'
import createSagaMiddleware from "redux-saga"
import todoSagas from './sagas'

const sagaMiddleware = createSagaMiddleware();
const composeEnhancers = window.__REDUX_DEVTOOLS_EXTENSION_COMPOSE__ || compose;
const store = createStore(
  reducer,
  composeEnhancers(
    applyMiddleware(
     sagaMiddleware
    )
  )
);

sagaMiddleware.run(todoSagas);

export default store;
步骤二, 创建 saga.js, export default 一个 generator. takeEvery(actionType, worker)会捕捉每一个action类型, 并执行对应方法worker. worker 可以是普通函数, 也可以是 generator, 最好用 generator (注意在 generator 中 ajax 不必使用 promise). 在worker中我们可以继续 dispatch action, 但不是用的store.dispatch, 也不是像 redux-thunk 那样会通过参数传入 dispatch 方法, 而是通过导入 reeux-saga/effects 中的 put 来进行dispatch.
/* sagas.js */
import { takeEvery, put } from "redux-saga/effects"
import { GET_INIT_LIST }  from './actionTypes'
import axios from "axios"
import { initListAction } from './actionCreators'

function* getInitList() {
  try{
    const res = yield axios.get("http://localhost:3000/data");
    const action = initListAction(res.data);
    yield put(action);
  } catch(e) {
    console.error("list request error!")
  }
}}

function* mySaga() {
  //console.log("mysaga");
  // 捕捉每一个action类型, 执行对应方法. 之前只能在reducer内捕获action类型
  yield takeEvery(GET_INIT_LIST, getInitList);
}

export default mySaga;
步骤三: 创建 mySaga 要捕获的 action 类型的 action creator.
import { GET_INIT_LIST } from "./actionTypes"
export const getInitListAction = () => ({
  type: GET_INIT_LIST
})
与 redux-thunk 相比, 他们都添加了中间 action, 通过发送中间 action 间接发送最终所需要的 action. 但是, redux-thunk 使得 store 不但可以 dispatch 一个对象, 还可以直接 dispatch 一个函数, 我们将异步请求或复杂逻辑放到这个函数形式的 action 中, 然后在这个 action 中继续 dispatch 最终所需的会直接改变状态的 action. 而使用 redux-saga 后, store 依旧是只能 dispatch 对象, 但是 redux-saga 可以捕获指定 type 的 action, 并执行对应的方法, 在这个方法中通过自己的put方法来继续 dispatch aciton.
此外, redux-saga 要比 redux-thunk 复杂得多, 它具有非常丰富的 API.
如何使用 React-Redux
React-Redux 是一个第三方模块, 可以帮助我们在 React 中更方便的使用 Redux.
如果你将 Redux 与任一类型的 UI 库结合使用, 你一般需要使用一个 “UI binding” 库来将 Redux 与 UI 框架结合起来, 而不应该直接在 UI 代码里调用它(如之前的做法, 直接在组件文件中导入store,手动store.subscribe等). React-Redux 是官方的将 Redux 与 React 结合起来的库.
有了它, 你无需再手动在每个组件代码文件中导入 store, 无需手动 subscribe, 手动检查更新的数据, 手动触发重新渲染. React-Redux 这样的 UI 绑定库处理了 store 与 UI库交互的逻辑, 你无需手动将二者联系起来.
总的来说,React-Redux 鼓励了良好的 React 架构,并帮助实现了复杂的性能优化。 它还与 Redux 和 React 的最新 API 更改保持同步。
第一个核心 API, Provider. 用它来将需要使用 store 的组件们包裹起来, 通过它连接 store, 连接之后其内部组件都有能力获取到 store:
/* App.js */
import TodoList from "./components/react-redux/TodoList"
import { Provider } from 'react-redux'
import store from './store';

function App() {
  return (
    <Provider store={store}>
      <TodoList/>
      <A/>
      <B/>
    </Provider>
  );
}

export default App;
第二步, 从react-redux中导入connect, 利用connect和两个后续创建的映射规则创建连接, 将TodoList组件包裹起来. 不再直接导出TodoList, 而是导出包裹后的. TodoList中也无需再导入store并调用store.subscribe(this.setState), 不再通过this.state访问, 而是通过this.props来访问. props 是两个映射结果的合并. connect将组件拆分成容器组件与UI组件. (connect(mapStateToProps, mapDispatchToProps)相当于返回容器组件, TodoList相当于容器组件)
import { connect } from 'react-redux'

const TodoList = (props) => {  // 使用react-redux, 组件可直接定义为无状态组件
  const { inputValue, list } = props;
  return (
    <div>
      <div>
        <input value={inputValue} onChange={this.props.changeInputValue}/>
        <button>提交</button>
      </div>
      <ul>
        {list.map((entry, i) => <li key={i}>{entry}</li>)}
      </ul>
    </div>)
}

export default connect(mapStateToProps, mapDispatchToProps)(TodoList);
第三步, 定义第一个映射规则. 创建一个函数, 这个函数用于将 state 映射为 props, 这个函数可命名为mapStateToProps.
/* Todolist.jsx */
const mapStateToProps = (state) => {
  return {
    inputValue: state.inputValue,
    list: state.list,
  }
}
第四步, 定义第二个映射规则. 创建一个函数, 这个函数用于将 state 映射为 props, 这个函数可命名为mapDispatchToProps. dispatch 其实就是 store.dispatch. component 中我们不再导入 store, 我们只能从这个函数中间接使用store.dispatch来修改 state. 由于 state 在这里被修改, 所以事件监听函数也放在这里, 再作为 props 传给 component.
const mapDispatchToProps = (dispatch) => {
  return {
    changeInputValue(e){
      const action = createChangeInputValueAction(e.target.value);
      dispatch(action)
    }
  }
}
参考资料